DEMO REEL CREATION This is just a self reminder of things I always forget when creating a demo reel. **FRAMES PER SECOND!!!! 24, 30 - SET IN MAYA - RIP FROM NTSC NOT PAL ** TV SAFE ZONES!!! SHRINK FOOTAGE IN PREMIERE ** LEAD TIME AND END SPACE - LEAVE A FEW SECONDS OF BLACK FRAMES AT START & END ** USE GOOD DVD AUTHOR SOFTWARE. TMPGENC DVD AUTHOR IS BEST!
Posts
MENTAL RAY TRIX That I always forget. As we all know, MR in a 32 bit situation cannot handle complicated scenes. A neat feature in Maya 2009 is an : *auto conversion of texture files to .map files. If you are using big textures, the .map hack is now available under..... SETTINGS/PREFERENCES / SETTINGS / RENDERING / use optimized textures (auto conversion) ***And here is a great little utility to convert all of your textures files to map files within maya itself. All you have to do is select your textures and it will bake them and re-associate them for you. Awesome. RIESS_IMF_COPY_DOWNLOAD
CREATING nCLOTH UV'S BEFORE DEFORMERS well, have you ever created Ncloth and found that your UV's are sliding like they are being projected? The problem is, you need to create your UV's BEFORE you create your cloth. If you find that your UV's are after your cloth in your history stack, don't dispair. 1. Select your cloth and delete your uv's 2. under nMesh hit 'display input mesh' -this will display your original object before it was clothed. 3. Apply new uv's or transfer to this object and voila...your uv's are pre-deformer. OR 1. Duplicate your cloth object. 2. Delete it's history. 3. Delete cloth's post deformer swimming uv's 4. Transfer the uv's from the duplicated object to your cloth
MOTION PATH VIA IK SPLINE Interesting technique, using the 'offset' value of an IK spline to drive a series of bones along a motion path curve. Of course..it doesn't work on a curve on surface which is what I'm trying to figure out. http://forums.cgsociety.org/showthread.php?f=88&t=259168&highlight=motion+path+tail Flow object on a motion path curve on surface stretches the object like mad.
RECORDING AUDIO FROM ANY VIDEO Sweet. Not really to do with CG but ever watch a youtube video and want to rip the audio from it? I do all the time. Here's a sweet tutorial on how to do it. *he rips to .wav but you can use other recording software to record to MP3. http://www.youtube.com/watch?v=zg3vs7oh32s
STUFF LEARNED ABOUT OBJECT TRAVEL ACROSS SURFACE Oh dear... Sometimes trying to acomplish the most simple things leads to many discoveries about the tools that you use. I will most definitely have to catalogue this because I don't want to have to figure this out in the future.... Techniques to have multiple objects travel across a surface in random different directions while obeying surface normals and directions. My first intuition was to run random instanced particles across a surface and somehow stick them to the surface. This can be done. Make a surface live, sketch particles on, throw down some gravity and get those particles moving... *but what if you need to direct those particles and also have them 'stick on'? Gravity will tell them that if they hit an edge, to fall off the surface. Plus with fields, you can't direct particles as precise as a picky client wants them :) So I figured, why not make the surface a goal? Great! So the particles move towards the vertic

FLASH RANT Arrgh. When I learned Flash about 10 years ago I thought "wow, this package has a lot of potential". I've just picked it up to re-do my website and I am shocked at the lack of user friendliness. Making a simple hyperlink to a button involves a ridiculous amount of scripting in "actionscript". Now I am all for having scripting in software however simple functions should be script invisible to users. Or accessible via a script history. All easy html funtions should be button or menu driven. And AHH! Having to copy every little detail to every keyframe if you make changes. No way to batch copy attributes or 'apply to all keys'. No linking or referencing Photoshop files which sucks when you want to change layer details. No global resizing without crunching bitmap edges. Anyway, popping up a window is a lesson in patience but here's a link http://www.flepstudio.org/forum/tutorials/649-opening-popup-flash-cs3-javascript.html
ALPHA TRANSPARENCY WHEN IN FRONT OF PRIMARY VIS OFF OBJECTS Absolutely insane amount of time wasted on this one. If you have objects mapped with transparency and there are objects behind it with primary visibility turned off...the alpha in mental ray will pick up that invisible object. Really silly bug. Solution: hide the invisible object instead of primary vis.
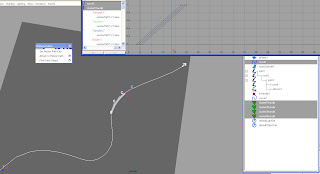
PATH ANIMATION WITH DEFORM Nice. For those path animations where you need the object to bend along the path like for example a snake, worm, tail etc etc. 1. Bind your object(s) to a joint chain 2. Create a spline IK solver 3. Cluster the IK curve 4. Attach those clusters to a motion path 5. Offset each cluster's U value by 1 successive frame down the chain Now you have each cluster following the motion path, driving the spline IK deformations. Sweet!
BAKING CYCLED CURVES I know this feature has been around for a while but - too damn cool again. Finding the right tools implemented in software when needed makes it all that much more exciting. Ever want a character to walk 5 steps in a cycle, stop then start walking again - without TRAX? Well you can bake out a cycled curve by using your bake curve tool and checking on the sparse curve bake option. CURVES/BAKE CHANNEL OPTIONS/SPARSE CURVE BAKE
PAINT WEIGHTS PROBLEM For some reason, a rig I was working on all of a sudden stopped working with the paint weights tool and no vertex info would show up in the component editor. No color feedback in the tool either. ERROR: value is out of range 0 would show up when trying to export weights or paint. I have no clue what happened but the fix was DELETE ALL BY TYPE/NON DEFORMER HISTORY Also I figured out that the skincluster node for the bind had lost all of the relationships to it's vertices. It was an empty deformation node. So I added them all back in with the edit membership tool. Also had to hack to remove history and get a clean unbroken bind.... - duplicated the bound mesh in it's bind pose. - smooth bound the duplicate to the skeleton. - used the "copy skin weights" to transfer it to the duplicate. - purged the history of the original as needed. - after everything is done, rebound the original to the skeleton. - used "copy skin weights" to get them


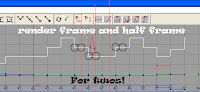
Cronin's 12 FPS animation method Well I wanted to come up with a way to animate within Maya on twos (every frame holds for 2 frames) then render out properly at 24 FPS without having to key every pose twice. I suppose one could animate at 24 fps and key every second frame twice. I decided to animate in Maya at 12 fps and set the render settings to render out twice as many frames, each keyframe duplicated. All done at render time. And here's how to do it. 1. In your preferences set the maya scene to 12 FPS. 2. In your globals set the 'by frame' to 0.5 - this will render sub frames inbetween (twice as many) i.e. frame 1, 1.5, 2, 2.5 .Maya will name the sequence properly. 3. For the subframes to be duplicates of the keys, they need to be the same values as the keys before them. Every frame needs a keyframe and every curve has to be stepped. This means we have to bake the animation curves and set them all to stepped before rendering. 4. Handy little MEL script to do that?.
CHARACTER MAP Well...not really a Maya trick but hey ...just learned this via google. Ever need those fancy characters in your text like ¢ ß Ć ® § Đ Well they are all accessible in windows character mapper. start menu/all programs/accessories/system tools/charater map Useful for photoshop text or Maya bevel text.
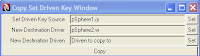
Attr & SDK COPY/PASTINGZ Some lovely tools in Maya's included bonus tools that allow quick and easy duplicating of attributes and driven keys. Under the animation tab we have 'replicate attribute' for all of those cool attributes you add to your rig. Simply select the object that you want to paste to, shift select the object and attribute channel of the object that has the custom attribute and hit 'replicate attribute'. Done. For set driven key transferring, a dialogue box pops up with 3 input boxes. 1. Set Driven Key Source - the channel that is being driven on the completed object (i.e. pSphere1.rY). 2. New Destination Driver - The driver object channel/attribute of the incomplete object. (i.e. pSphere2.bender) 3. New Destination Driven - The driven channel of the incomplete object. (i.e. pSphere2.rY) Hit copy and you are done. No more manually setting up millions of similar rig attributes and controls.